2019-12-31
One Last Post For 2019
Well, 2019 is quickly drawing to a close, it feels like only yesterday that 2018, and 2017 before it were quickly drawing to a close. My how time flies faster and faster as you get older.
Happy New Year Everybody!
新年あけましておめでとうございます!
Happy New Year Everybody!
新年あけましておめでとうございます!
2019-12-25
Merry Christmas, all!
皆さん、 メリークリスマス!

皆さん、 メリークリスマス!
2019-11-30
Digits
Not the number kind, but finger kind...
I love watching how-to videos on Youtube, I think it's actually an addiction...
But, I am seeing things among carpentry videos and metal-working videos which make me cringe. Safety, or a lack thereof... I wonder how many of these people will be missing portions of their hands in the future?
Get safe, pay attention, and THINK BEFORE cutting!
じゃまた
2019-11-29
Numbers
Wow, I've actually written more postings this year than last! :)
Things are looking up. I hope to get a few more posts up before the New Year. Maybe a couple tied in to my Youtube channel. (Located here: number6of1) Keep your eyes peeled - I want to get my latest project complete and up here in the next week or so.
じゃまた
Things are looking up. I hope to get a few more posts up before the New Year. Maybe a couple tied in to my Youtube channel. (Located here: number6of1) Keep your eyes peeled - I want to get my latest project complete and up here in the next week or so.
じゃまた
2019-10-20
Barbarism
I once made the mistake of calling boxing barbaric to someone who was obviously a boxing fan...
Well, once again, I have been proved correct.
27-Year-Old dies of traumatic brain injury in the ring...
I stand by my statement that boxing is barbaric.
A sign of human depravity.
じゃまた
Well, once again, I have been proved correct.
27-Year-Old dies of traumatic brain injury in the ring...
I stand by my statement that boxing is barbaric.
A sign of human depravity.
じゃまた
2019-07-24
One more on the Brute-Force filter
Here is what LTSpice says the response should be...
Not that different from what you see on the scope in the previous post.

Of course, LTSpice assumes perfection in everything from parts values to wiring to solder joints...
じゃまた
Not that different from what you see on the scope in the previous post.
Of course, LTSpice assumes perfection in everything from parts values to wiring to solder joints...
じゃまた
Latest Project
So, I asked if anyone could figure out my next project...
Corrected schematic:


Sorry that the connectors are not
quite right, couldn't find any Ac wall
plugs or line cords in Kicad...
Here's a PCB layout...
What is it?
Anyone guess?

Board etched and tinned, a
coil off to the side...
(Along with my reading glasses, I hate getting old(er) ;) )

Circuit board complete...
Any ideas yet?
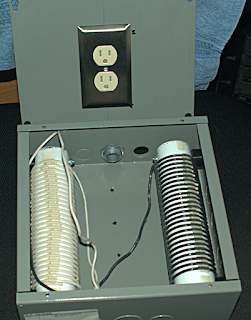
Box with two of the coils mounted...
10 uH each (approximately)
Box is 10" x 10"
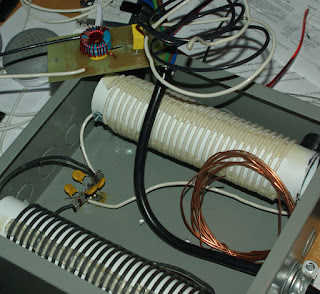
Almost there...
Some pretty thick wire...
 Generating a signal into the input
and watching the output on a scope.
Input starting at about 100 Hz
and sweeping to about 100 Khz
 Here it is...
What is it?
A Brute-Force Line Filter,
Containing a common mode choke.
Hopefully, to help deal with the
cheap switching wall warts which
pollute the airwaves so much. :/
On to the next project (circuit board with toner layout in the last shot.)
じゃまた
Corrected schematic:
quite right, couldn't find any Ac wall
plugs or line cords in Kicad...
Here's a PCB layout...
What is it?
Anyone guess?
coil off to the side...
(Along with my reading glasses, I hate getting old(er) ;) )
Any ideas yet?
10 uH each (approximately)
Box is 10" x 10"
Some pretty thick wire...
and watching the output on a scope.
Input starting at about 100 Hz
and sweeping to about 100 Khz
What is it?
A Brute-Force Line Filter,
Containing a common mode choke.
Hopefully, to help deal with the
cheap switching wall warts which
pollute the airwaves so much. :/
On to the next project (circuit board with toner layout in the last shot.)
じゃまた
2019-03-17
Reassembly...
Well, here it is going back together.

Vertical elements reassembled, not wound yet.

Antenna temporarily reassembled, ready to solder leads onto coils.

3D printed brackets to hang the antenna.

Final assembly, mounted and ready for testing! And almost invisible unless you are looking for it!
Sweet.
Watch for me on 40 and 80!
じゃまた
Sweet.
Watch for me on 40 and 80!
じゃまた
Cutting and Unwinding...


Coils...
Time to assemble some coils.
So here are the coils on their mountings, wound and connected to brass fittings:
 You see a lot of real-estate above and below the coils, that is structural.
 You can see here how the coil and structural components fit inside of the 2" vac tubes.
I haven't cut anything yet, this picture is with left over vac tube.
じゃまた
So here are the coils on their mountings, wound and connected to brass fittings:
I haven't cut anything yet, this picture is with left over vac tube.
じゃまた
On With The Show!
So, now that I've shown a preview of what's to come, on with the show, the antenna is taking shape, or unshape, as the pictures show:
So, here is the antenna coming back down, while it worked, I wasn't too happy with the performance and decided to add loading coils.
 Here are the vertical elements disassembled and ready to be unwound, yuck, after winding and taping I have to untape and unwind..
じゃまた
So, here is the antenna coming back down, while it worked, I wasn't too happy with the performance and decided to add loading coils.

じゃまた
2019-03-03
A preview: The Next Project!
Well, I'm not quite done with the current project, but I'm almost there (I hope.)
So it's time to start thinking of the next one. (Gotta have SOMETHING on the go.)
Can you guess what it is/isn't?
No, these connectors are not accurate, but there weren't any proper 3 prong electrical
symbols in Kicad. :/
** Edit: Oops, those capacitors labeled as 4700 uf should be 4700 pf... **
じゃまた
So it's time to start thinking of the next one. (Gotta have SOMETHING on the go.)
Can you guess what it is/isn't?

No, these connectors are not accurate, but there weren't any proper 3 prong electrical
symbols in Kicad. :/
** Edit: Oops, those capacitors labeled as 4700 uf should be 4700 pf... **
じゃまた
2019-03-02
Coils
Winding the coils...
31 turns (21 feet) of # 14 Solid.

じゃまた
31 turns (21 feet) of # 14 Solid.
じゃまた
2019-02-25
Coil-forms (mostly complete)
Here are the mostly complete coil forms:

じゃまた
じゃまた
2019-02-22
Loading Coils Continued
Assembling my loading coils into a kind of structural element. I know, looks weird, but, as Jeremy Brett used to say as Sherlock Holmes: Patience! All will be revealed!


This is a portion of one of two loading coil assemblies
The blackish substance is a two - part epoxy, being used basically as a spacer between the coil body and the plastic pipe.
A closer look at the epoxy.
Stay tuned (hehe - stay "tuned?")
じゃまた
2019-02-15
Back to The Antenna
Well, time to get back to this antenna and get it finished, finally.
The forms for the loading coils, with brass hardware:


More later.
じゃまた
The forms for the loading coils, with brass hardware:
The last (hopefully) of the 3d printed bits:
More later.
じゃまた
2019-01-14
Antenna/Balun again
So here is my next project (tied to the antenna and balun)

These are coil forms. 3D printed, about 8 Inches long. Going to make
some loading coils to (hopefully) move my apartment antenna down to 40
meters. Time to calculate, wind and solder.
じゃまた
Antenna update.
Well, I put the antenna up, it appears (if my calculations are correct) that the resonant frequency is sitting around 18 Mhz... Given my preferred band is usually 40 meters, that means there is a problem. The autotuner was able to get the SWR down to about 1.5:1, but I'd like to have it come down from something other than infinity (well, OK, a bit of an exaggeration, but you get the picture) I can use it as is, maybe try 15 during the day, or even 20. We'll see.
2019-01-05
Almost There!
So here are a couple of shots of the complete 4:1 balun, one from the top, the other from the bottom showing the so239 connector and silicone calking (which looks messy) to plug the wire holes for the ground connection to the connector.
Top

Here is the antenna, made out of 2 inch vacpipe and tees for a built-in central vacuum system, vertical arms are about 6 foot long.


Reports when I finally load it up. I think I may have to add a couple of loading coils to get to 40 meters.
じゃまた
Top

Here is the antenna, made out of 2 inch vacpipe and tees for a built-in central vacuum system, vertical arms are about 6 foot long.
Here is the balun attached to its 3d printed mount hanging off the bottom of the antenna.
**Note** this 3d printed piece is brittle and one of the layers started to break away when I tightened the screws. Gorilla flue to the rescue... :/
Reports when I finally load it up. I think I may have to add a couple of loading coils to get to 40 meters.
じゃまた
2019-01-02
Balun/Antenna progress
The mounting bracket for the balun...

じゃまた
じゃまた
Subscribe to:
Posts
(Atom)
CatWalker

CatWalker at 29

